Monday, 17 August 2009

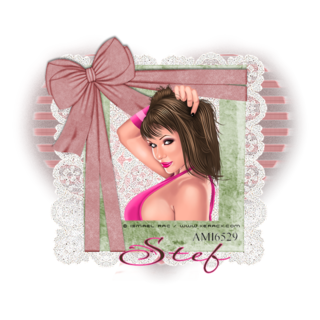
Stef,s a Babe

Photobucket


SUPPLIES NEEDED
Tube of choice i,m using ISMAEL Rac,s
Font of choice
MASK 191 BY WEESCOTS LASS
scrap kit here
I,VE GOT PERMISSION FROM FARRAH TO SHARE THIS KIT
OPEN A NEW IMAGE 700X700 FLOOD FILL WHITE
OPEN A PAPER OF CHOICE COPY AND PASTE AS A NEW LAYER
GO TO LAYERS AND LOAD MASK 191 FROM WSL
DELETE MASK LAYER AND MERGE GROUP
OPEN FRAME 3 AND PASTE AS A NEW LAYER
PLACE IN MIDDLE OF YOUR HEART
CLICK ON YOUR MAGIC WAND AND INSIDE SELCTIONS MODIFY AND EXPAND BY 4
COPY AND PASTE A PAPER OF CHOICE
SELECTIONS INVERT AND DELETE SELECTIONS NONE
MOVE BELOW FRAME LAYER
COPY AND PASTE THE LACE BACK AND PASTE BEHIND FRAME LAYER
RESIZE TO JUST OVER THE FRAME I NRESIZED IT 135
PASTE YOUR TUBE AS A NEW LAYER
AND POSTION INSIDE FRAME
ADD YOUR NAME
ADD ALL COPYRITE,S AND URL,S
DUPLICATE YOUR HEART LAYER ON THE ORGINAL LAYER GO TO ADJUST GLAUSION BLUR 22
THEN GO TO EFFECTS DISTORTION WIND 50
ALL DONE SAVE AS
This Tutorial is written by me and any resemblance to any other tutorial is purely coincidental.
TUTORIAL WRITTEN 17th OF August 2009 BY CHEEKY. DO NOT COPY OR ALTER IN ANY WAY OR CLAIM AS YOUR OWN.

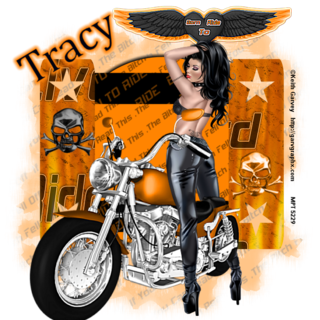
Tracy,s Fell Off Lol

Photobucket

Supplies Needed:

Im using the art of Elias Chatzoudis HERE

You will need the proper licence to use his work.

The scrapkit i am using is ftu Born to ride by Stef . HERE

I am also using template #09 By Sanie . HERE

MASK 222 BY WEESCOTSLASS HERE
Lets Begin:

Open template in psp

Shift+D To duplicate.

Close the original.

Delete the credit layer.
Click on circle layer,add a new raster layer,drag this under the circle layer,

Rename layer,Background Layer,Image,canvas size,700 x 700,floodfill white.

Click on Circle layer again,Selections,select all,float,defloat,Invert,

Copy and Paste Paper of choice as a new layer,hit delete,select none.

Delete original Circle Layer.

Click on Rectangle 1 Layer,Selections,select all,float,defloat,Invert,

Copy and Paste Paper of choice as a new layer,hit delete,select none.

Delete original Rectangle 1 Layer.

Repeat this for the other Rectangle Layer.

Click on Copy of Long Rectangle Layer,Selections,select all.float,defloat,invert,

Copy and Paste Paper of choice as a new layer,hit delete,select none.

Repeat above for copy of long Rectangle layer

Delete original Long Rectangle Layer.

Add elements of choice.

Add your tube,placeing it where you like it best,

Add New layer and paste paper of choice
move to bottom

Go to layers and find mask 222 and click ok

delete mask layer merge group

add a drop shadow of choice.

Layers,Merge,Merge all flatten.

Add all copyrights,Add name of choice,

BATTY HALLOWEEN

Photobucket


SUPPLIES NEEDED

TUBE OF CHOICE I,VE USED ELIAS CHATZOUDIS FROM MPT
SCRAP KIT OF CHOICE I USED A KIT FROM MONICA called
Halloween Treats here

MASK WEESCOTSLASS 247 here

OPEN A NEW IMAGE 600X 600 FLOOD FILL WHITE
CHOOSE A PAPER AND PASTE AS A NEW LAYER
GO TO LAYERS FIND WEESCOTSLASS MASK 247
AND LOAD DELETE MASK LAYER AND MERGE GROUP
CHOOSE ONE OF THE FRAMES AND PASTE AS NEW LAYER
CLICK INSIDE YOUR FRAME LAYER WITH MAGIC WAND
SELCTIONS MODIFY BY 4 COPY AND PASTE ANOTHER PAPER
AND SELECTIONS INVERT AND DELETE SELECTS NONE
MOVE BELOW FRAME LAYER
COPY AND PASTE TUBE OF CHOICE AND PASTE UNDER FRAME LAYER
ADD ANY ELEMENTS OF CHOICE
ADD ALL COPYRITES N URL,S
ADD YOUR NAME AND NUMBER AND SAVE AS
This Tutorial is written by me and any resemblance to any other tutorial is purely coincidental.
TUTORIAL WRITTEN 17th OF August 2009 BY CHEEKY. DO NOT COPY OR ALTER IN ANY WAY OR CLAIM AS YOUR OWN.
Wednesday, 29 July 2009

MY HEART,S DESIRE

Photobucket


Supplies Needed


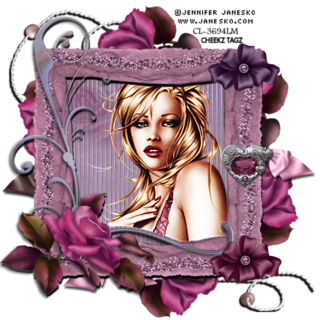
Tube of choice. I am using the Brillaint artwork of Jennifer Janesko.

You can purchase a license to use her art HERE. this link takes you to david nestler,s but it,s cilm so look for jennifer,s sorry

This Awesome Free Scrapkit is called " Rose Boudoir " from Sophisticated Scraps

You Can Find this Awesome Kit Here

Thankyou Lisa


Open a new Image 600 x 600 White

Copy and Paste Frame 1 .. Resize to 90%

Copy and Paste Paper 2 .. Resize to 50% move below your Frame Layer and erase any Paper showing outseide your frame

Add a Drop Shadow to your Frame Layer

Copy and Paste Your Tube of Choice and Position between your Fram and Paper Layer .. Adjust .... sharpen

Copy and Paste Frame 3 .. Resize to 75% and Place just above your BackGround Layer ...

Copy and Paste Beaded String 2 .. Position .. Add a Drop shadow .. Move just above your Background Layer

Duplicate your Layer Image Mirror and Position

Copy and Silver Heart Accent 1 .. Resize to 30% .. Position and Add a drop shadow of Choice

Copy and Past Bow 1 .. Resize to 50% .. Position and Add a drop shadow of Choice

Please Remember to add the Correct Copyright to your Finished Tag
This Tutorial is written by me and any resemblance to any other tutorial is purely coincidental.
TUTORIAL WRITTEN 29th OF JULY 2009 BY CHEEKY. DO NOT COPY OR ALTER IN ANY WAY OR CLAIM AS YOUR OWN.
Tuesday, 7 July 2009

I,M YOUR SLAVE

Photobucket

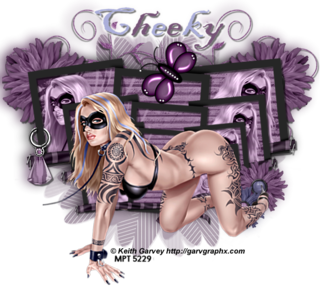
Tube of choice. I am using the artwork of Keith Garvey You can purchase a license to use his art HERE

Scrap Kit is Free Colab Kit Called " Sisters With Attitude " Created by Krissy and Paula HERE You can Download this Kit from Either Krissy or Paula's Blog

Dont forget to check out both Blogs for other awesome Kits

FONT ANY WILL DO

Mask Created By Chelle 130 HERE Included in My Supplies

Place your Mask in your Masks Folder


Open a new image 600 x 550 flood fill white

Copy and Paste KSFrame 3 .. Resize 70%

Magic wand .. select all areas inside all 3 Frame Areas .. Selections .. Modify .. Expand by 4

MAKE SURE YOU GET ALL THE SPACE,S IN THE BOWS

Copy and Paste KSPaper 2 .. Resize 60% .. Selections .. Invert .. Delete on your keyboard .. Selections .. select None

Move your Paper layer below your Frame Layer

Copy and Paste your tube .. Position between your Frame and Paper Layer .. Resize and erase any tube showing outside your Frame

Change the blend mode to Luminance (L) Postion on the left side of your Frame .. Repeat for the Right side Area of your Frame

On Your Frame Layer .. Drop Shadow

Close off your Background Layer and Merge all other layers visable

Duplicate your Layer 3 times.. Resize 80% and Position .. See my Tag for Positioning

Ensure your Background Layer is still closed off .. merge your 4 layers Visable

Copy and Paste SADDoodle 2 .. Resize 80% Poition to the Right of your Tag .. Drop Shadow .. Duplicate .. Image Mirror

Merge these layers down

Erase any doodle showing on both layers at the bottom of your Tag

Move under framed layer

Copy and Paste KSFlower 3 .. Resize 50% .. Drop Shadow .. Position .. Duplicate .. Image .. Mirror

Merge down and move behind Doodle layer

Copy and Paste KSCharm 2 .. Resize 50% .. Erase a small area of the silver ring .. See my Tag for reference .. Drop Shadow

Copy and Paste KSFlower 3 .. Resize 30% .. Drop Shadow .. Position .. Repeat with KSFlower 4 only Resizing to 25%

Ensure your Background layer is closed off .. Merge all other layers Visable .. Duplicate

On your Bottom Image Layer .. Adjust .. Gaussian Blur set at 10

Making sure your on your Background Layer Copy and Paste SADPaper 2 .. Resize 15% .. Apply your Mask .. Layers .. Merge Group .. Lower the layer Opacity to around 50

Add your Tube .. Name and all Correct cr to your completed Tag
This Tutorial is written by me and any resemblance to any other tutorial is purely coincidental.
TUTORIAL WRITTEN 7TH OF JULY 2009 BY CHEEKY. DO NOT COPY OR ALTER IN ANY WAY OR CLAIM AS YOUR OWN.
Wednesday, 17 June 2009

shaking the booty

THIS IS MY NEW TUT I HOPE SOMEONE LIKES IT
Shaking the booty
http://Photobucket

THE TUT IS INTENDED FOR THOSE THAT HAVE A WORKING KNOWLEDGE OF PSP

supplies
You will need psp and animation shop
Elias Chatzoudis you can purchase is tubes herehttp://www.mypsptubes.com/
And any mask will do I used wsl 173 mask I don’t have the link sorry
Font is arial which u should have


In psp open new image 600x600 add a new raster layer flood fill white
Add a new raster layer and pick a colour from your tube

Duplicate your mask layer and resize 60% all layers unchecked
Add your tube as a new layer place in centre of your mask layers
Name this tube 1 duplicate it and name tube 2
Grab your warp brush set it with these settings
Warp mode size 115 hardness set at nil strength at 100
On your top layer postion your warp tool on her left cheek( bottom) push her hip up a bit to the left then push her hip
left and down a bit to left click the tick on the warp settings so it will work duplicate the warped layer and name it warp 2nd repeat the above warped settings again moving it a bit further you should have 3 layers tube 1 and tube 2 and warped layer duplicate your first warped layer and place under tube 2
Add all copyrite,s and url,s
Put name to your tag
Hide warped 2 and tube tube and copy of tube 2 layers copy merged and take to animation shop
Paste as new animation back in psp x out tube 1 and un x copy of tube 2 copy merged and in animation paste after current layer
Back in psp repeat the above till all layers ave been took in animation shop
Edit select all animation frames to 50
Save as

Monday, 15 June 2009

RAC,S TOO RISKY


SUPPLIES NEEDED
TUBE OF CHOICE
SCRAP KIT FTU CALLED ALWAYS EQUAL FROM HERE


OPEN NEW IMAGE 600X600 FLOOD FILL WHITE
COPY AND PASTE BRACLET 1 AS NEW LAYER AND SHARPEN
GRAB YOUR MAGIC WAND AND CLICK INSIDE FRAME
GO TO SELETIONS AND MODIFY BY 7
COPY AND PASTE PAPER OF CHOICE IMAGE RESIZE 50% SELECTIONS INVERT ON PAPER LAYER
HIT DELETE SELECT NONE
CLOSE OFF YOUR BACKGROUND LAYER
AND MERGE LAYERS VISABLE
DUPLICATE TWIZE AND POSTION LIKE MINE
COPY AND PASTE DOODLE 1 RESIZE 70%
ADD DROP SHADOW AND PLACE UNDER FRAME LAYER
DUPLICATE DOODLE LAYER AND MIRROR
COPY AND PASTE BOW RESIZE 60%
AND POISTION WERE YOU LIKE DUPLICATE AND MIRROR
COPY AND PASTE BUTTERFLY OF CHOICE AND PLAC WERE YOU LIKE
IMAGE FREE ROTATE 30 TO LEFT DROP SHADOW
CLOSE OFF YOUR BACKGROUND LAYER AGAIN
AND MERGE VISABLE RSIZE 95% ALL LAYERS UNCHECKED
DUPLICATE YOUR LAYER
ON ORGINAL LAYER ADJUST BLUR GAUSSIAN BLUR AT 15
AND EFFECTS TEXTURED EFFECTS WEAVE ON SETTINGS
GAP -1 WIDTH-2 OPACITY - 1 WEAVE COLOUR BLACK GAP COLOUR BLACK FILL GAPS CHECKED
MERGE LAYERS TOGETHER MAKE SRE YOUR WEAVE LAYER IS ON TOP
ADD TUBE OF CHOICE
ADD ALL COPYRITE,S AND URL,S AND NAME
ALL DONE SAVE AS PNG
This Tutorial is written by me and any resemblence to any other is purely coincidental.
TUTORIAL WRITTEN 15TH OF JUNE 2009 BY CHEEKY. DO NOT COPY OR ALTER IN ANY WAY OR CLAIM AS YOUR OWN